Sunday, 14 December 2008

A gothic romance


This is one of my post-processings that I'm happiest with. I was in Krakow in Poland (beautiful place, BTW) where I found this entrance. I really liked the old-fashioned door and decor and took a few pics, but when I reviewed them, they were quite flat. It was nice enough, but nothing to write home about.

I thought it would work better in a Sepia mode, as it would give off the aged atmosphere I was looking for in the shot but even then, if wasn't really anything special. So I added a couple of texture to add some random grain and marks.

This is what it looked like with two different colored textures applied. One is in overlay mode, the other in linear burn (trial and error is a must to see how a textures works best with a photo)

I then converted it into a sepia shot and adjusted the lighting and contrast and this is the end result. I used a layer mask for the door and the number sign when applying the final layers as it was way too dark, in order to bring them a bit in the foreground.

And from a rather flat cafe door , a somewhat Gothic and atmospheric entrance emerged.

Wednesday, 24 September 2008

A simple Eye enhancement

Did you always wondered why the eyes pop out in the pro-photos, and are completely flat in your own photos ? Well it is because of some simple post-processing technique. The idea is to locally enhance the sharpness of the eyes. Here is how it is done. Take the following photo and open it with your favorite photo editing software. I suggest you to use GIMP as free software, or any other paying software (sorry no publicity if they do not give me any money).

Copy the layer, and apply the Unsharp mask. (under gimp it is found in the Filter->Enhance). Use quite high values for the Radius and Amount

You now have two layers. The lower one is the original photo, and the one above is the enhanced one. Now add a mask layer on the top photo, and use black for full transparency. This means that even though you have 2 layers, you see the one below. Choose the paintbrush tool, and white color. If you have a tablet, be sure to adapt the opacity as function of pressure. If not, then do not choos white color for the brush, but a gray, about 20%.


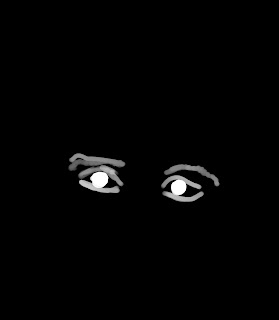
Begin to paint around and inside the eyes. At all the positions you paint in white (gray) the upper layer will be shown, and for the rest you keep the lower layer. Hence only the eyes will show sharpened and not the rest. Here is how the final mask looks like


Finally the image looks like that. Just turn on and off the visibility of the upper mask in order to see the result. See how the eyes pop-up ? So easy. So remember always Post-Process

Thursday, 11 September 2008

Simple Levels adjust

Here is a simple post-processing technique. The following photo of Rio de Janeiro is quite dull. It does really not reflect the beauty of the colors at time of shooting. Download the photo and try yourself

Nevertheless it is possible to do some simple post-processing and get a nice picture out of it. Open your favorite editor and choose the Levels Adjust dialog.


Slide the right and left cursors until you get a pleasing result. Now finally we need
to adjust the composition a bit.

Find a new composition that gives an more interesting point of view


Voila. Simple

Aging a photo (2)


I decided I want to age the picture and give it a more moody atmosphere. First thing I did was make it black and white but keep the ruins themselves in color. Some minor adjustments in contrasts and lighting followed. I also added some noise. It still lacked something.


After that, I added a texture that gave it a nice grainy feel and darkened the edges for that "old" feel.
And that's how it came out in the end.

Aging a photo (1)


This is the original photo of the Acropolis Hill. While it's nice enough in itself, it really didn't do much for me.